
Nambu World: Type 89 “Knee Mortar”
(Heavy Grenade Discharger)
One of the most feared weapons in
the Japanese arsenal was the Type 89 Heavy Grenade Discharger (hachi-kyu-shiki ju-tekidanto, or more
commonly just tekidanto). This weapon
received the dangerously unfortunate English nickname of “knee mortar”; the curved base plate
was meant to be braced against a solid
foundation (the ground, a log, etc.), NOT one’s knee, as the recoil would
result in broken bones or worse. The Type 89 covered the gap between the range
a hand grenade could be thrown and the range of a true mortar. Because of its
small size (less than 60cm, or 24” long) and light weight (about 4.7 kg, or
10.5 lbs.), it was easily portable. In a standard Japanese infantry division, a
regiment of 3,843 men had about 108 of these, or one per 36 men, according to
the US Army Handbook on Japanese Military
Forces, October 1, 1944, p. 22. By comparison, the regiment would have had
112 light machine guns and 36 heavy machine guns. The Type 89 was extremely
accurate in the hands of a skilled operator. The Japanese made about 120,000 of
them. The “89” in Type 89 refers to their introduction in the Japanese year 2589,
i.e. 1929.
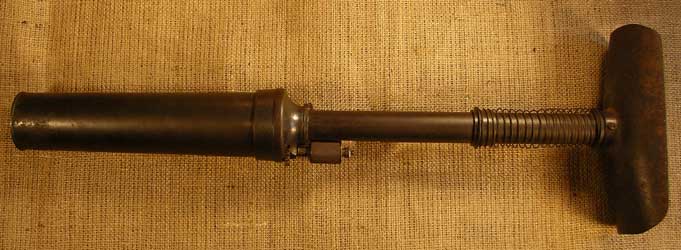
Here is a front view. The line on
the barrel was for aiming purposes. The knob just below the barrel was for
range adjustment (more on that below), the trigger mechanism is the lever with
the triangular loop in the middle, and the spring at the base was actually a
frame for a canvas cover to keep dirt out of the mechanism. A lanyard or
leather tab was often attached to the double-action trigger mechanism to make
it easier to pull.
Here is a back view. There is a
cross-sectional view of the mechanism in the Nakata & Nelson book Imperial Japanese Army and Navy Uniforms
& Equipment, New Revised Edition, p. 31.
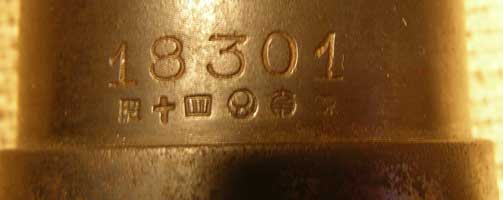
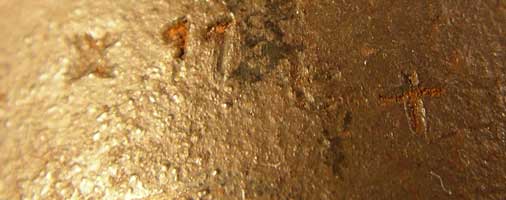
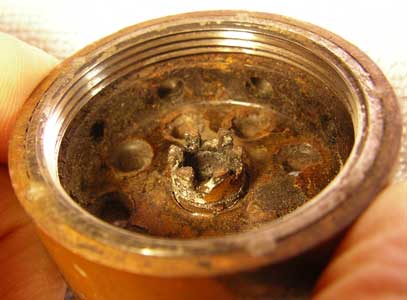
The serial number is at the base of
the barrel. This number is on all major parts. Below the serial number is a
string of symbols. The first three say Sho
(short for Showa) 14, indicating manufacture in the 14th year of
the reign of the Showa Emperor (i.e. Hirohito). This translates to 1939. The
next symbol, which looks like a lop-sided 8 in a circle, is the mark of Nagoya
Arsenal, under whose supervision it was made. The third symbol is the character
Nan/Nam, which literally means
“south”. It was the corporate logo of Chuo Kogyo, Japan’s largest war-time
private manufacturer of small arms, formed in 1937 by a merger of Lt. Gen.
(ret.) Kijiro Nambu’s company with two other private firms. In other words,
this one was made by Chuo Kogyo under Nagoya Arsenal supervision. The character
at the far right is a bit hard to see in this shot, but it is the kanji to as
in
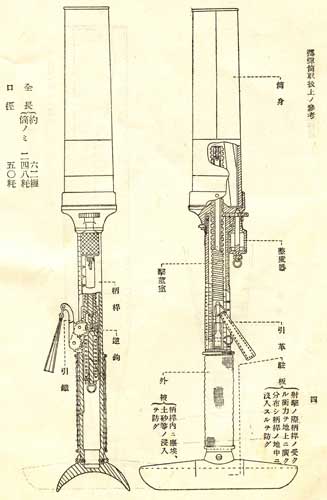
This shot shows the range adjustment
knob (the knurled cylinder on top). As you turn this knob, it works through
gears to move the range adjustment screw up and down. Note that there are two
range adjustment scales, one on each side of the slit through which you can see
the adjustment screw. The one on the left side (bottom of the photo) is for the
Type 89 round, which was purpose-made for such weapons (a deactivated one is
shown below). That scale goes from 120 to 650 meters. The one on the right side
(top of the photo) is for use with a Type 91 multi-purpose (hand/rifle/mortar)
grenade with a booster attached, and goes from 40 to 190 meters.

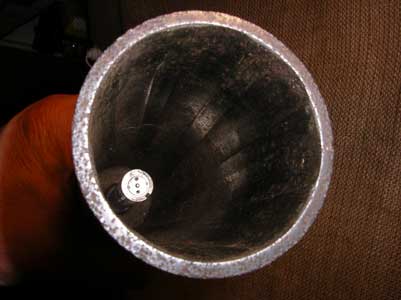
Here is a look down the barrel,
which is rifled. The calibre is 50mm. The little post you see in the middle has
a dual function. It holds the firing pin in the centre, but also serves as an
adjustable platform that is part of the range-adjustment mechanism. When the
knob referred to in the above photo is screwed to the minimum range position,
this little post/platform is very high in the barrel, and only allows the round
to drop in about 60mm, or 2.5” (the round sticks out of the barrel at this
position—see below). When the range is set to maximum, the post/platform is
down at the bottom and the round will drop in about 250mm (10 inches). This is
the only range adjustment; the weapon is always held at a 45 degree angle to
the ground, and some even had a spirit level sight to let you know when you
were at exactly 45 degrees. The way this works is that when it is set at
minimum range, there is plenty of room for the gases to expand so they don't
develop very high pressure, and as a result the projectile leaves at a very low speed and
doesn’t go very far. At the maximum range setting the pressure is much higher
and imparts up a lot more velocity to the projectile,
so it travels a lot further. Even at the maximum range setting, however, the
muzzle velocity is very slow, well below the limit that defines a firearm in
The full serial number is on major parts lke
the base plate (foot) and the column (there is a lot of deep pitting on the
baseplate, but the number is still visible).

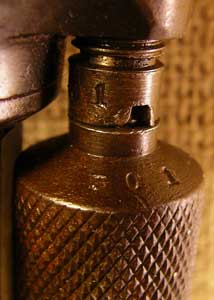
Smaller parts like the range adjustment knob
have the last three digits of the serial number.
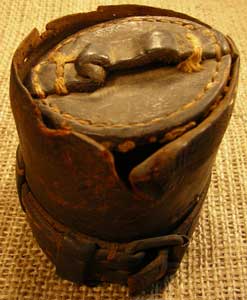
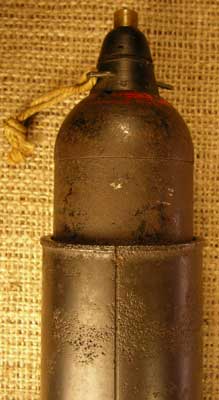
This unit came with a very rare accessory,
i.e. this leather barrel cap. As you can see, it is in rather precarious
condition. It is obvious it was on this unit a long time, as there is pitting
around the outside of the barrel that exactly corresponds to the area covered
by the cap (the leather would absorb any moisture and hold it against the
metal, eventually causing corrosion). The strap around the bottom of the cap
was to tighten it so it would stay on. My specimen of this rare accessory
appears in a photo on page 40 of the book The Knee Mortars of Japan 1921-1945
(see book description below). Other accessories included a canvas
carrying case and a canvas tool and spare parts kit. I don’t have any of these,
but there are some excellent photos in the Sugawa book, Nippon no gunyoju to sogu (“
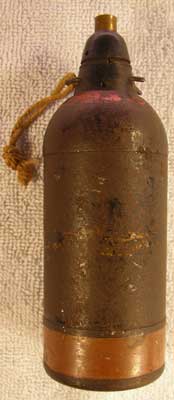
Here is the main round used. It is
often called a Type 89 mortar shell, but a Japanese book I have calls it the
Type 88. I think Type 89 is correct, but the fuze is a Type 88. The string was
used to pull out the safey pin to activate the round, which has a contact fuze
(the little thing that sticks out of the top). The basic round was black, with
stripes in colours that identified exactly what type it was. This round is
pretty well worn, but you can see some of the red at the top and slight
remnants of a yellow stripe around the middle. I think the red means Army (vs.
Navy) and the yellow designates it as a high explosive round. The brown band
around the bottom is actually tarnished copper, which served a special purpose
described below. The rounds were carried in a pouch that held four of them
(there is a photo in the Sugawa book referred to above). This round is covered
in some detail in the Department of the Army Technical Manual TM 901985-5, Japanese Explosive Ordnance (Army Ammunition, Navy Ammunition), pp. 372-376).
The markings on the top of this round indicate
it was made in Showa 18, 9th month, i.e. September, 1943.
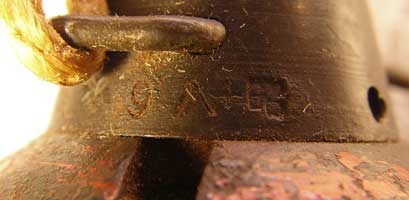
The two marks on the far left are the kanji
character saka (as in
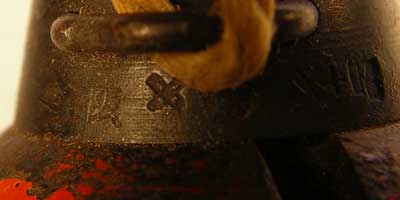
The body of the round (the middle
part that held the explosive) alo has the crossed cannon mark at the far left
and the date, read from right to left, 17 in kanji and 11 in standard numerals.
This probably indicates that part was made in November, 1942.
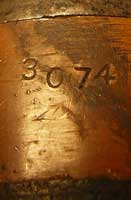
The copper band has the number 3074 stamped on
it.
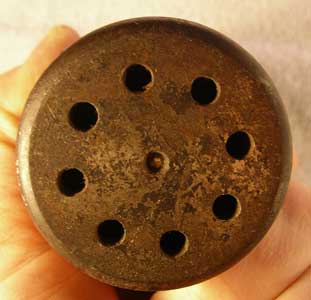
Here is a view of the bottom. The
holes were to allow gases from the firing of the propellant to escape and drive
the round up and out the barrel. The primer was in the centre.
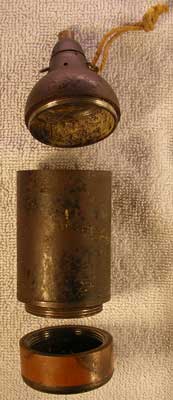
Here is the round disassembled into
the base (bottom), which held the propellant, the body (middle), which held the
explosive, and the top, which held the fuze. This round has been de-activated,
so it is completely inert, with no explosive or propellant.
Here is the inside of the base. It
had an ingenious design to solve the dilemma of how to get a round small enough
in diameter to drop down the muzzle freely to also be large enough to engage
the rifling. You can see that not only are there holes in the bottom to allow
gases to escape out and drive the round upwards, but also holes around the
outside edge of the base. You can also see the reddish copper expansion band
around the outside. When the primer was struck, it ignited the propellant. The
gases from combustion pushed through the holes in the bottom to propel the
round out of the weapon, but also outward through the holes around the rim to
expand the copper band. The copper band then provided a seal and engaged the
rifling to give the round an accuracy-enhancing spin like any rifled weapon.
Inside this part there was originally a copper cup to keep the propellant dry,
but it is missing. You can also check out the great photos at this link Japanese 50mm Knee
Mortar - Inert-Ord.net. For details on the Type 91 grenade and how it was used
in the Type 89, please see Japanese Type 91
Grenade - Hand, Rifle or Mortar - Inert-Ord.Net. If you are interested in
ordnance in general, check out the rest of the inert-ord.net site, too, as it
has lots of great stuff from many countries and was put together by a very
knowledgeable collector.
As noted above, when the weapon is
set to minimum range, the round protrudes from the barrel. This shot also shows
the aiming line more clearly. This was often highlighted with paint to make it
easier to see.
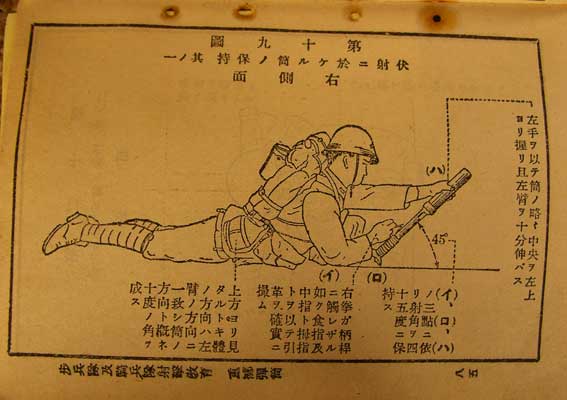
I
have a manual on shooting techniques for all the standard Japanese weapons, and
it has a section on how to shoot the Type 89. The manual is called Shohei shageki kyohan, “All Arms Guide to
Shooting”, volume 2, and is dated November 7, 1939. I will
translate the text eventually, but as you can see, it basically explains from
different angles what to do to shoot the weapon correctly. The first diagram
shows a side view of prone shooting. Note the emphasis on holding the weapon at
a 45 degree angle to the ground.
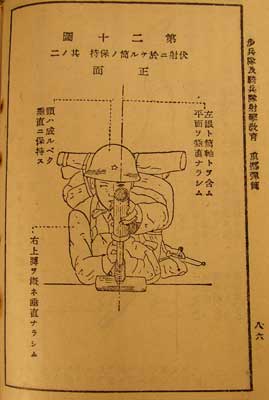
Here is a front view of prone shooting.
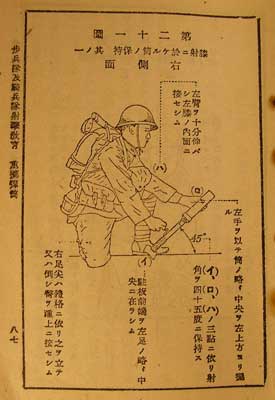
Here is a side view of shooting from the
kneeling position, again showing the 45 degree angle.
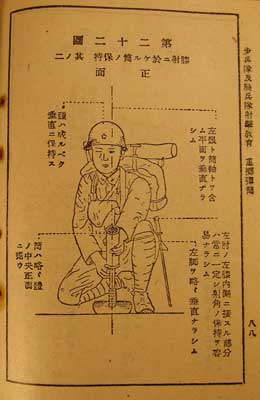
Finally, a front view of shooting
from a kneeling position.
I also have two manuals that are solely on the knee mortar. This first one is just slightly larger than the typical small black pocket manual format. It is 92mm by 125mm (3-5/8" X 4-15/16") and has 90 pages. The date in the back is May, Showa 14 (1939). The title in light golden colour on the front is teki-dan-to-hik-kei, "Manual on the grenade discharger". The little sticker in the upper right corner is a sort of ownership stamp, it seems. There is very faint green printing on it with numbers penned in with dark blue or black ink. The far right column says Sho-wa 17 5 gatsu (May, Showa 17, i.e. 1942). The middle column says kyo-ka-sho (permission stamp). The column on the left says dai-ni-chu-tai-cho (commander of the second company). The lower left corner of the tag has a red signature stamp on it but it is too faint and blurred to read (there is a name stamp inside the back with the name Okayasu, but I can't tell if this is the same name). It is mostly text with the same sort of diagrams as above. There is one cross-sectional diagram at the back, but my other manual has a larger and clearer version of the same diagram, so I have reproduced it below. The title is repeated on the spine. The back is plain black.
My other manual is much larger, 148mm by 221mm (5-7/8" X 8-11/16"). It has 78 pages and is dated June, Showa 13 (1938). the content is much different, with a lot of very technical close-up diagrams. The cover has the title in large characters in the column in the centre: teki-dan-to-tori-atsukai-jo-no-san-ko (Reference on the Handling of Knee Mortars). In the upper right corner it says it was compiled by the Army Infantry School and has a preface by the head of the school, Lt. Gen. (Chusho) Toshio Miyake (the Japanese Wikipedia site on the school says he was its head from August 2, 1937 to June 25, 1938). The lower left says riku-gun-ho-hei-gak-ko-sho-ko-shu-kai-sho. "Army Infantry School Commissioned Officer Assembly Hall". The title and this last line are repeated on the spine.
The back just has a handwritten note Ichi-chu-tai, ichi-han, i-uchi (First company, first squad, Iuchi, the latter being a family name).
This cross sectional diagram shows the screw mechanism that adjusts for range. It is found on page 4.
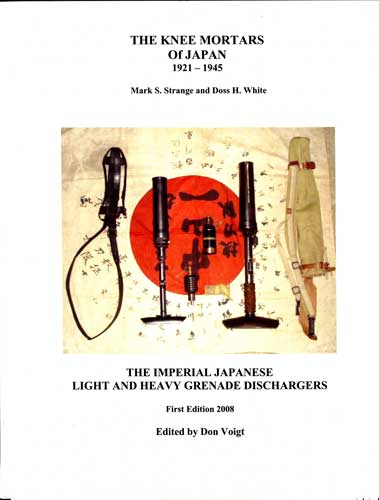
If you want to know everything there is to know about the Type 89 knee mortar and its predecessor, the Type 10, here's the book you need to get. It just came out in mid-2009 and is available through Banzai.
Click here to go back to the Other Militaria
Page:
Nambu World: Teri's “Other Japanese
Militaria” Page
Click here to go back to the main page:
Nambu
World: Teri’s WWII Japanese Handgun Website
Last updated: June 9, 2006; book added
July 29, 2009; August 11, 2009. All contents are copyright Teri unless otherwise specified and may not
be used elsewhere in any form without prior permission.