Type
26 Photos (Project Gun)
I got this gun at a reasonable price
at an auction in

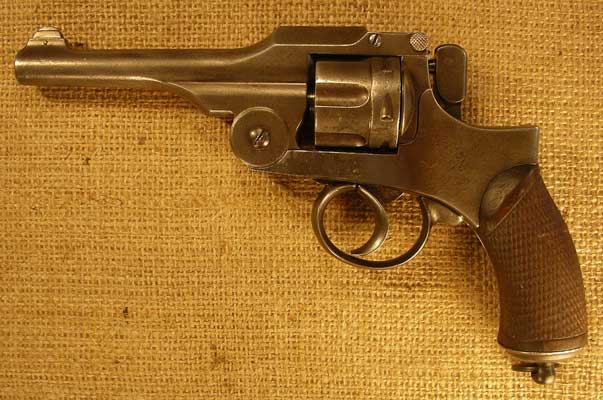
Here is the left side. Two more
problems are obvious here. First, the hinge pin screw has been replaced by a
brass screw. Second, there is a large chip missing from the bottom front of the
left grip panel that has been “repaired” with plastic wood.

Here is a close-up of the Tokyo
Arsenal marking, the model designation (2-10-6-year-type, i.e. Type 26), and
the serial number.

Here is a close-up of that brass
screw. The correct screw would be steel and fill the entire circular recess
around the head of the brass screw. While original Type 26 parts are almost
impossible to find, a screw that can be adapted to the purpose should be
possible to find once I determine the thread type required. If not, making a
screw is not that big a deal for someone with good machinist skills like my
husband.

In this shot you can see the missing
lanyard loop and stud as well as the plastic wood used to repair the chip. The
characters on the butt are inspection markings.

Closer inspection of the grip shows it also has
a crack.

The loose fit of the sideplate here at the point where there is a finger grip
for opening it and the signs of rough treatment in that area suggest some other
problems, the exact nature of which was not obvious prior to disassembly. Much
more on that to come…

During the inspection period before
the auction I was able to examine the gun, but I could not get it to open, so I
didn’t know what awaited inside. However, I knew there would be problems,
because the whole gun just did not “feel right”. The barrel latch was way too
stiff, it was too hard to tilt down the barrel, etc. Once I bought it and
(after an interminable registration delay) was able to bring it home and get it
apart, I realized the full scale of the problems as well as what had caused
them. Some of the problems were just dirt and grit that needed to be cleaned
from the remote recesses of the revolver. However, the major problems resulted
from the fact that at some point in the past someone forced open the sideplate without swinging down the trigger guard first.
They did this by inserting a screwdriver between the sideplate
and frame and hitting it with a hammer. This bent and cracked both the locking
stud on the inside of the sideplate and the “stirrup”
inside the frame that it fits into. A similarly inelegant means of disassembly
was attempted in other spots, even where it made no sense (e.g. between the
extractor cam and the hinge on the lower barrel assembly). This brute force
approach resulted in numerous burrs that affected the smoothness of the
mechanism. Most of the functional problems can be fixed with just a little
polishing with a stone to remove the burrs, although little can be done about
the cosmetic damage. However, the locking stud on the inside of the sideplate was so badly cracked that the tip was just barely
hanging on and fell off when I was cleaning it. Fortunately my husband Stephen
can either weld or silver-solder it back on. I also discovered that the strut
spring was missing and had been replaced by a piece of thin cardboard that had
been folded over to give the strut some “spring”. This part should also be
possible to fabricate, since I have two other guns to use as examples (this
spring is a little V-shaped spring that fits between the front of the trigger
and the strut).
The plastic wood used to “repair”
the chip in the left grip was actually mostly stuck to the frame rather than
the wood. I got it all off much more easily than I had expected.
The serialization of parts on Type
26 revolvers is a bit complicated because they used sub-assembly numbers which
did not always correspond to the last digits in the gun’s serial number as they
did on later models like the Type 14. The procedures also varied over time. In
the serial range which includes this gun, two sets of numbers were used,
neither of them related to the gun’s serial number. One is recorded on the left
side of the frame under the grip and the other on the right side of the frame
under the grip (this placement of the numbers, at least, is common to all Type
26s). Amazingly, despite the poor condition of this piece, all the numbers
matched. The parts that need to be replaced (hinge pin screw and strut spring)
are not numbered.
By mid-October we had finished the
repairs. When I fix an old gun, I try to do the minimum possible to get it
working again. I don’t try to make it like new. A little age on a gun makes it
looks interesting, at least to me.
Here’s what we did.
My husband Stephen pounded the
stirrup for the locking stud flat and then silver soldered the crack. He also
silver soldered the head of the stud back on. Then I cleaned them up with a
fine file and then a stone. The stud took a lot of work because it has been
bent as well as broken, so I had to do a lot of file and stone work to get it
to fit back into the stirrup.
Here is the stirrup after repair but before
bluing.

This is it after bluing. Notice that the bluing
doesn’t take on the silver solder.

Here is the stud before bluing…

…and after (it has oil on it, which is why it
is so shiny in this shot).

Here is the grip repair. I used LePage’s plastic wood and filed and sanded it to shape. It
took several applications to get the contours right and fill in the low spots.
Fortunately the chip was only on the outer edge and didn’t go into the
checkered area. I used Minwax Wood Finish stain, #225
Red Mahogany. I was very pleased with the colour
match, which was as close as one can get, I think. If you look at the grip
closely you will definitely see the repair, but if you just handle the gun
casually I doubt anyone would notice. My husband Stephen also glued the crack
for me with Crazy Glue. By applying it from the inside, it spread by itself
without leaving a trace on the outside (actually, is isn’t even really visible
from the inside, either—you don’t need much of that stuff).

Original Type 26 parts are almost
impossible to find, so I bought a new hinge pin screw and a lanyard ring
assembly from a well-known producer of repro parts for Japanese militaria, Don Schlickman. I was going to have my husband make the screw,
but it turns out the Japanese used an obsolete thread he couldn’t duplicate.
The parts from Don looked and fitted great. They are a bit new looking given
the state of the gun, but the revolver has enough patina on it that it is not
that noticeable. (There is a link to Don’s parts list on the “Parts” section of
this site.). I also made one thing myself, the little V-shaped strut spring that
fits into the front of the hammer. First I made one out of 1/64” thick brass
strip, 3/32” long. Then once I had the shape and size down I made one of out of
.010” stainless steel cut 3/32” wide (both the brass and steel strips were from
a hobby shop).
Here is the lanyard ring assembly
installed on the gun. It is held in place by a tiny little screw that is
actually more like a pin with a couple of turns of thread on one end. The slot
in the head was so small I had to use my glasses screwdriver; all my gun
screwdrivers were too big. The two studs to the right and left of the lanyard
assembly fit into holes on the bottom of the grip to hold it on.

Here
is the right side of the final product. One other repair Stephen helped me with
was the trigger guard. It had gotten bent outwards just enough that it was
extremely difficult to get it to release and swing downwards. Stephen put it in
a vise and bent it back. The metal was amazingly springy, so he had to bend it
quite a bit to get the metal to change its “memory”. Now it has just about the
right amount of resistance.

Here is the left side. This was more
work than most US collectors would find worthwhile for a gun in this condition,
but Japanese stuff is so scarce up here in
Click here to go back to the Type 26
Gallery: Type 26 Photo Gallery
Click here to go back to the Nambu World: Teri’s WWII Japanese Handgun home page: Nambu World: Teri’s WWII Japanese
Handgun Website
Last updated: October 19, 2005. All contents
are copyright Teri unless otherwise specified and may not be used elsewhere in
any form without prior permission.